Cockpit Device Example
July 23, 2026
About Cockpit Devices
A Cockpit Device generically refers to an X-Plane plugin, where users can create a stand-alone cockpit "device" like a Garamin GNS430, Aspen 1000, Garmin G5, simple LCD GPS, or a Nav/Radio, and programmatically draw the screens for these devices.
With Cockpit Devices, your drawing functions do NOT draw to X-Plane's panel texture as was/is commonly done in the past. Cockpit Devices are the NEW and BETTER way to draw screens via a plugin. For cockpit devices, your plugin drawing ends up on a 3D polygon in an OBJ file, rather than the aircraft's panel texture; therefore you must configure an OBJ polygon to receive your "screen drawings" as it were. This assignment is commonly done in Blender and when output to the OBJ, the OBJ takes the simple form as shown below, with the device_ID name specified (RDR2000_WXR in this case, more below about the device_ID).
ATTR_cockpit_device RDR2000_WXR 1   6   1
TRIS    0 636
The common denominator for all cockpit devices is that they have a screen, and they (because they're plugins) may be reused across aircraft. The screen can be as simple as a one-line LCD display, or the fanciest of EFIS screens.
Drawing APIs
Historically, cockpit devices were drawn using C++ drawing APIs like openGL or Cairo, which required LOTS of code to handle not only the graphics, but just the window itself; however with X-Plane's new Panel Graphics API, you can draw graphics much easier than before, focusing only on the graphics, and let X-Plane handle all the other stuff like Metal/Vulkan and window gymnastics like visibility, hiding & closing & popping out the screen, etc.
X-Plane's new Panel Graphics API is available in both our C++ SDK, AND our new XLua2 API.
NOTE: ... you must be running a version of X-Plane that supports the Panel Graphics API!</u>

--install_name="X-Plane 12.4.4-pnl3-ccccc498"
XLua2 API Example
This section presents a tiny XLua 2 script that puts one line of text ("Hello World") on a cockpit screen. It creates a custom avionics device, then paints that device's screen every frame, with a black background and white text on top. It is the smallest complete example of a common pattern you will reuse to create "cockpit devices", "custom avionics", "screen displays", "panel graphics", etc...they all mean the same thing.
NOTE
For more complex, multi-mode, multi-screen EFIS instruments, you will most assuredly need more sophisticated data structures and file organization, using Lua's require and dofile mechanisms. This document does NOT cover those design paradigms and puts all code in one single Lua file.
Common "Panel Graphics" Nomenclature
| Avionics / Cockpit device | A Plugin generated "screen" (optional bezel overlay) that your script draws onto; X-Plane handles the "window logistics" |
| Device ID | (deviceID) A unique text name YOU choose for your device, no spaces. Caps not required, but good practice. (i.e. "BOBS_GNS430"). The aircraft OBJ file references this name in the OBJ. It is also the name you enter in Blender's GUI for configuring cockpit devices. (which gets exported to the OBJ) |
| Panel graphics | A generic term for X-Plane's "simplified API" (as opposed to openGL) for drawing panel instruments. It requires a version of X-Plane that supports it. The API consists of polygons, lines, text, images, etc. |
| Draw callback | A function that X-Plane calls to draw the screen. You do not decide when to draw it; X-Plane calls it (by default, once per frame). You can put your drawing code in the one callback, or use it to call other drawing functions (the more common paradigm) |
| Bezel vs Screen | The screen is the glass you draw instruments onto; the bezel is the surrounding frame with buttons/knobs that is drawn after the screen, AND...bezels are only drawn when the device is shown as a 2D pop-up window. The bezel graphic/callback is optional. |
| TTF font | A TrueType/OpenType font file. You load one into a font handle, then draw text with it. |
EXAMPLE (minimal comments):
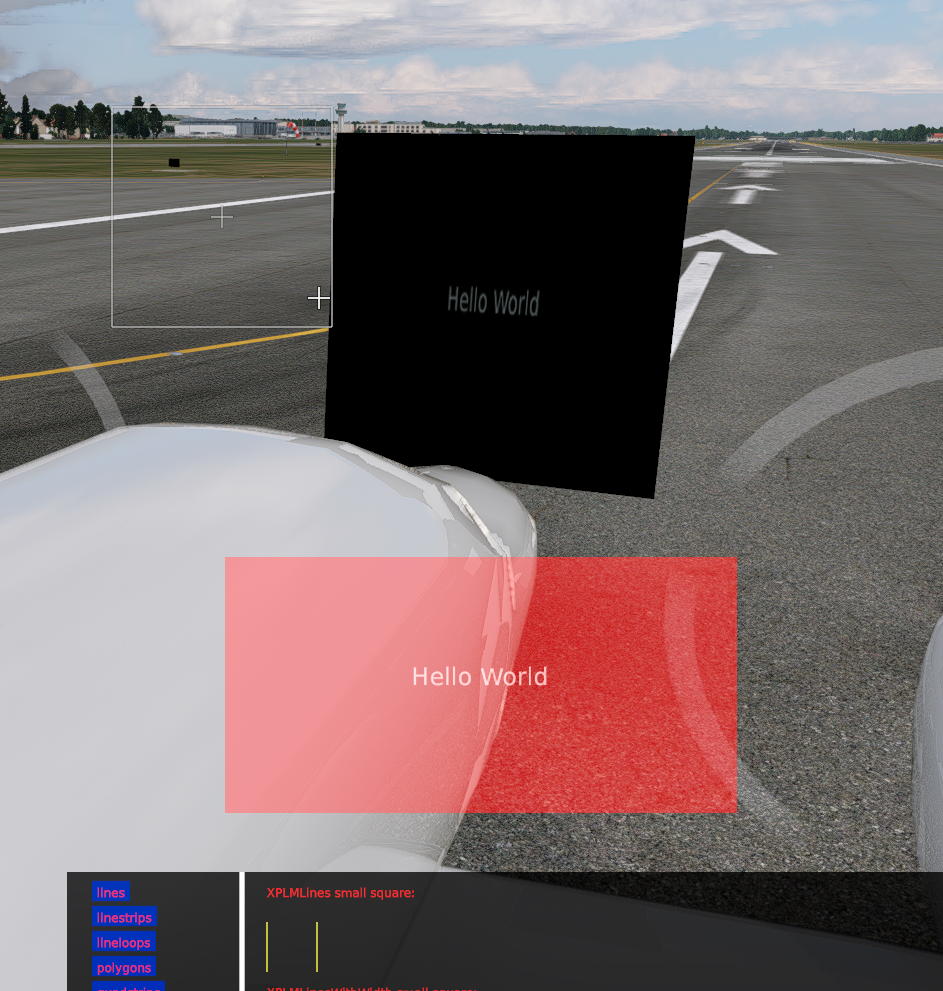
Click to Enlarge
The code below will produce a ATTR_cockpit_device in 3D AND in 2D. There is one callback for each view and as you can see in the image, they do not have to be the same. This code produces the following graphics:
--[[ XLua 2.0 ]]   --<<< THIS IS REQUIRED AT TOP OF FILE TO USE XLUA2 API  !!!!

require('XPLMPanelGraphics')    --  Require the Panel Graphics Module

------------------------------------------------------------------------------------------------------
--  GENERAL NOTES:
--
--  VAR names preceded by a 's_' mean those var values are String types
--  VAR names preceded by a 'c_' mean those var values are Constants
--  FUNCTION name suffixes with '_cb' mean that function is a callback
--  Function arguments named 'ref' are optional and only a passthru for you to do with what you like.

--  MAKE SURE:
--  Your Polygon has a texture assigned, this will be the "power off" background.....so really dark!
--  Your Cockpit Device has been assigned to a power bus.
------------------------------------------------------------------------------------------------------


-- File Scope VAR Declaration / Initialization

local c_screen_width        = 512.0     --  or SCREEN_WIDTH     =   512
local c_screen_height       = 256.0     --  or SCREEN_HEIGHT    =   256

local s_fontHandle          = nil       -- type = XPLMFontHandle, created once in XPluginStart
local s_myAvionicsID        = nil       -- type = XPLMAvionicsI,  created/destroyed with enable/disable

------------------------------------------------------------------------------------------------------
--  Draw callbacks Definition (2 drawing callbacks, 1 for screen + 1 for bezel
--  These draw a Full-screen opaque black rectangle, and white text, center justified
--  Verticie pairs are Lua tables of the form: {x=n, y=n}, which are panel pixel coords;
------------------------------------------------------------------------------------------------------

local function screen_draw_cb(ref)

    local my_screen = {
        { x = 0.0,              y = 0.0             },
        { x = 0.0,              y = c_screen_height },
        { x = c_screen_width,   y = c_screen_height },
        { x = c_screen_width,   y = 0.0             }
    }

    XPLMPolygon(XPLMMakeColor(0, 0, 0, 1), my_screen, 4)

    XPLMFontDrawString(
        s_fontHandle,
        XPLMMakeColor(1, 1, 1, 1),              --  color, packed via XPLMMakeColor
        24,                                     --  font size in pixels
        c_screen_width / 2,                     --  x: horizontal center
        c_screen_height / 2,                    --  y: baseline near vertical center
        "Hello World",                          --  window title
        XPLMJustification_t.xplm_JustCenter)    --  Justification state for drawn text/font
end

----------------------------------------------------------

--  This is the callback for what gets drawn ONLY in the 2D popup.  For illustration purposes.
--  We made this polygon color red and translucent to show its difference, rather than the Black,
--  opaque 3D version above.  Note that the 3D texture is stretched to fill the polygon shape.

local function bezel_draw_cb(ambR, ambG, ambB, ref)
    local box = {
        { x = 0.0,            y = 0.0             },
        { x = 0.0,            y = c_screen_height },
        { x = c_screen_width, y = c_screen_height },
        { x = c_screen_width, y = 0.0             }
    }
    XPLMPolygon(XPLMMakeColor(1, 0, 0, 0.5), box, 4)
end

--------------------------------------------------------------------------------
-- MAIN Lifecycle Callbacks
--------------------------------------------------------------------------------

function XPluginStart()
    s_fontHandle = XPLMCreateFont(XPLMCharSet_t.xplm_CharSetUnicode)

    XPLMFontAddFace(s_fontHandle, "Resources/fonts/DejaVuSans.ttf")

    return true
end

----------------------------------------------------------
function XPluginEnable()

    local device_params = {
        screenWidth         = c_screen_width,
        screenHeight        = c_screen_height,
        bezelWidth          = c_screen_width,   -- bezel size only matters for the pop-up
        bezelHeight         = c_screen_height,
        drawCallback        = screen_draw_cb,
        bezelDrawCallback   = bezel_draw_cb,
        deviceID            = "my_Device_Name",     -- unique name, no spaces, <= 64 charsit
        deviceName          = "My Device Name",     -- user-readable label for UI dialogs
        contentType         = XPLMWindowContentType.xplm_WindowContentTypePanelGraphics
    }

    s_myAvionicsID = XPLMCreateAvionicsEx(device_params)

    XPLMSetAvionicsPopupVisible(s_myAvionicsID, true)

    return true
end

----------------------------------------------------------
function XPluginDisable()
    if s_myAvionicsID then
        XPLMDestroyAvionics(s_myAvionicsID)
        s_myAvionicsID = nil
    end
end

----------------------------------------------------------
function XPluginStop()
    if s_fontHandle then
        XPLMDestroyFont(s_fontHandle)
        s_fontHandle = nil
    end
end
EXAMPLE (w/verbose comments):
--[[ XLua 2.0 ]]
-- hello_device.lua
--
-- Minimal "Hello World" cockpit device for XLua 2. Creates a custom avionics
-- device that renders with the native panel-graphics API and draws the text
-- "Hello World" into its screen every frame.
--
-- FILE LAYOUT (the folder name and the .lua filename must match):
--   <aircraft>/plugins/xlua/scripts/hello_device/hello_device.lua
--
-- To route this device's screen onto a 3D-cockpit mesh, the aircraft OBJ marks
-- those polygons with ATTR_cockpit_device referencing the deviceID string set
-- below ("hello_device").
-- VERIFY: the exact ATTR_cockpit_device argument syntax (the tokens that follow
-- the device name) is not documented in the XLua source; confirm it against the
-- current OBJ8 spec / Plane Maker before shipping.

-- One require is enough: XPLMPanelGraphics pulls in XPLMDisplay (the avionics
-- API), XPLMDefs and XPLMUtilities for us.
require('XPLMPanelGraphics')

-- Screen size in pixels: the framebuffer the draw callback paints into.
-- Panel coordinates have their origin at the bottom-left, with +y going up.
local c_screen_width  = 512.0
local c_screen_height = 256.0

local s_fontHandle    = nil   -- XPLMFontHandle, created once in XPluginStart
local s_myAvionicsID = nil   -- XPLMAvionicsID, created/destroyed with enable/disable

--------------------------------------------------------------------------------
-- Draw callbacks
--------------------------------------------------------------------------------

-- Screen-draw callback (XPLMAvionicsScreenCallback_f: fun(inRefcon)).
-- X-Plane does NOT clear the screen between frames, so we paint an opaque
-- background first, then draw the text on top of it.
local function screen_draw_cb(ref)
    -- Full-screen opaque black rectangle. Vertices are {x, y} in panel coords;
    -- a rectangle is convex, which XPLMPolygon requires.
    local bg = {
        { x = 0.0,            y = 0.0             },
        { x = 0.0,            y = c_screen_height },
        { x = c_screen_width, y = c_screen_height },
        { x = c_screen_width, y = 0.0             }
    }
    XPLMPolygon(XPLMMakeColor(0, 0, 0, 1), bg, 4)

    -- "Hello World" in white. x/y is the text baseline at the justification
    -- anchor; JustCenter anchors the string's horizontal center at x.
    XPLMFontDrawString(
        s_fontHandle,
        XPLMMakeColor(1, 1, 1, 1),           -- color, packed via XPLMMakeColor
        24,                                  -- font size in pixels
        c_screen_width / 2,                  -- x: horizontal center
        c_screen_height / 2,                 -- y: baseline near vertical center
        "Hello World",
        XPLMJustification_t.xplm_JustCenter)
end

-- Bezel-draw callback (XPLMAvionicsBezelCallback_f: fun(r, g, b, refcon)).
-- Only used while the 2D pop-up is visible. We fill it dark so the pop-up
-- window isn't left undrawn; the r/g/b args are the ambient light tint.
local function bezel_draw_cb(ambR, ambG, ambB, ref)
    local box = {
        { x = 0.0,            y = 0.0             },
        { x = 0.0,            y = c_screen_height },
        { x = c_screen_width, y = c_screen_height },
        { x = c_screen_width, y = 0.0             }
    }
    XPLMPolygon(XPLMMakeColor(0, 0, 0, 1), box, 4)
end

--------------------------------------------------------------------------------
-- Plugin lifecycle (the standard XPLM entry points XLua 2 calls)
--------------------------------------------------------------------------------

-- One-off setup, once per script lifetime: build the font. A font is created
-- once and reused; never create it per frame. Enable/disable cycles must NOT
-- tear it down, which is why it lives here and not in XPluginEnable.
function XPluginStart()
    s_fontHandle = XPLMCreateFont(XPLMCharSet_t.xplm_CharSetUnicode)
    -- A TTF that ships with X-Plane, so the path is always valid.
    XPLMFontAddFace(s_fontHandle, "Resources/fonts/DejaVuSans.ttf")
    return true
end

-- Armed state: create the avionics device. XPluginEnable can fire more than
-- once, so this is paired with XPLMDestroyAvionics in XPluginDisable.
function XPluginEnable()
    -- structSize is omitted on purpose: the Lua binding fills it in for you.
    local device_params = {
        screenWidth  = c_screen_width,
        screenHeight = c_screen_height,
        bezelWidth   = c_screen_width,   -- bezel size only matters for the pop-up
        bezelHeight  = c_screen_height,
        drawCallback      = screen_draw_cb,
        bezelDrawCallback = bezel_draw_cb,
        deviceID   = "hello_device",     -- unique, no spaces, <= 64 chars; the
                                         -- OBJ's ATTR_cockpit_device references it
        deviceName = "Hello Device",     -- user-readable label for UI dialogs
        -- Draw the screen with the native panel-graphics API (vs. a browser).
        contentType = XPLMWindowContentType.xplm_WindowContentTypePanelGraphics
    }

    s_myAvionicsID = XPLMCreateAvionicsEx(device_params)

    -- Optional: pop the device up in a 2D window so you can see output without
    -- an aircraft OBJ wired to it. Remove this once the OBJ references the device.
    XPLMSetAvionicsPopupVisible(s_myAvionicsID, true)

    return true
end

-- Teardown partner to XPluginEnable: release the device armed there.
function XPluginDisable()
    if s_myAvionicsID then
        XPLMDestroyAvionics(s_myAvionicsID)
        s_myAvionicsID = nil
    end
end

-- Final teardown before unload: release the font created in XPluginStart.
function XPluginStop()
    if s_fontHandle then
        XPLMDestroyFont(s_fontHandle)
        s_fontHandle = nil
    end
end